Monday, December 7, 2015

Victorian wrapper dress

I started volunteering at a pioneer farm in October. I already had the appropriate underpinnings (chemise, corset, petticoats) but nothing to wear them with, so I was really excited to have an excuse to venture into the Victorian period. As a child, I was obsessed with pioneers and read all of Laura Ingalls Wilder's books.

I'd been making due with some long, gathered skirts paired with a white blouse with white embroidery. It looked good, but wasn't all that comfortable to wear. Plus, I looked fat. So for the sake of my vanity, I decided I needed a dress.

I chose the Laughing Moon #120, 1840s-1860s Pleated Wrapper. Reasons for choosing it: unlined (except for the yoke), no darts to mess with, seemed straightforward and it's very pretty. The dress can be pleated or gathered; I pleated it because I used a medium-weight homespun fabric and I wasn't sure how well it would look gathered.

I was a little bit afraid that this dress would look dumpy but it doesn't. It looks amazing. I freaking love it.


The fabric is a lovely homespun plaid in shades of cream, olive, blue, and rose that had been in my mother's stash for over 20 years. I fell in love with it when I first saw it and took it for MY stash--a couple of years ago. I think it's perfect for this style of dress.


It was a bit of a challenge to find a big enough work space to lay out the pattern pieces, which are basically huge rectangles. I finally had to lay my cutting board and fabric out on my bed. My fabric is 60 inches wide; I can't remember how much of it I had, but I believe it was 5 yards. I had fabric leftover after cutting all the pieces out.

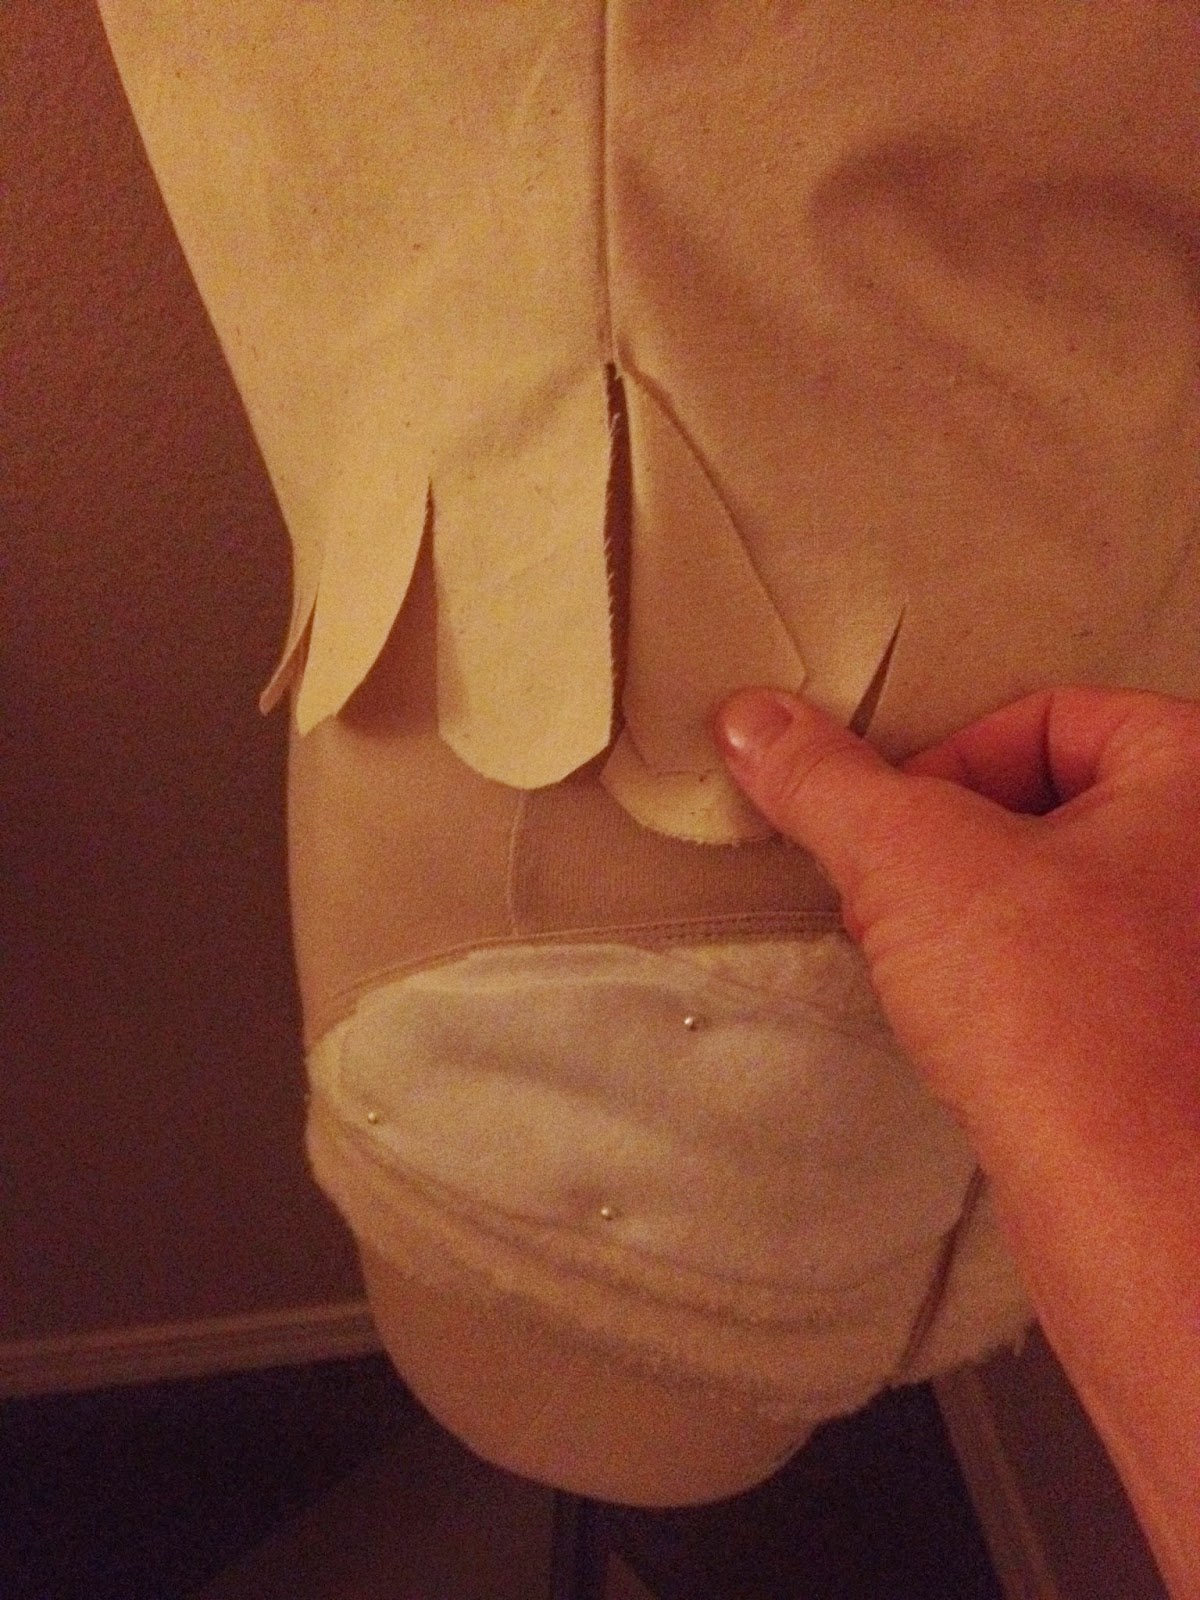
I was a bit stressed out about the pleats and transferring the markings to my fabric, and then I decided to just insert pins where the pleat markings were.


To make the pleats, I picked up one pin, brought it over to its partner and laid it on top, and pinned in place. It resulted in really beautiful, neat pleats.


The instructions said to stitch the pleats down along the waist line, but that was difficult for me, so I just stitched them down along their length. It keeps things nice and neat and looks more tailored.

I had an easy time putting this dress together, but the problems came with finishing the neckline and front. I'll edit this to show pictures of those instructions, but basically they were as follows:

1. Finish the neckline seam with piping (I didn't make piping, so I just made a strip of bias tape from the dress fabric to finish the neckline), stopping at the fold line for the front edges. The piping is long enough to extend to the front fold lines, but you are to leave it loose.

2. Fold down the top edge of the center front 5/8 inch. I'm presuming this is referring to the unpiped part of the neck line, but... How the hell do you do that? I consulted with two sewing friends and they were baffled as well. If you fold that part down, it folds down into a triangle. I ended up snipping the fabric at the edge of the piping so that I could do the fold.

3. Press the raw edge of the center front in 1/4 inch, then fold the front edge along the fold line and stitch down. That's straightforward, except... What am I supposed to do with the piping that's still dangling from the neckline? It's never resolved. I just ended up cutting it off with pinking shears.

4. Finishing the closures--it's simple enough if you want to put buttons all the way down, which I didn't. Buttons are expensive! That's a lot of buttons! I chose to go with the option of stitching down the center front from just below the waist to the hem. The instructions made zero sense to me. So the center front edges are completely finished at this point. You are supposed to overlap them at the center front line, then flip the overlap over the top of the underlap and sew along the fold line... How can that possibly look right. When you put hooks and eyes or buttons in the bodice, the front edges will overlap, but below the waist they are sewn together like a normal seam. I gave up and just plonked one edge over another and top-stitched it down.

It's not perfect--the plaids don't match up perfectly, but it's hard to tell unless you're looking closely. This isn't my fault. I marked the pattern pieces all along the edge where the cream strip in the plaid starts and stops, and I cut them out one layer of fabric at a time. But the stripes didn't match up with my markings when I laid them out on the second layer of fabric, and I have no idea why.

The hemline is shorter in the front than the back because: boobs. I hadn't thought to take that into consideration. It's really not very noticeable though, and it does make it easier to walk in the dress.

The hem was also slightly longer on one side of the front, so when I lined up the front edges to sew them together, I had to try to ease in the extra length on that side. I didn't do the best job at that, but after fussing with it for so long I finally just stopped caring and decided my next dress would be better. :D


Friday, September 25, 2015

18th Century Riding Habit Shirt

I finished my waistcoat for my pirate costume a few weeks ago and just haven't taken the time to update. I did end up putting buttonholes in it, and I am kicking myself for avoiding anything needing buttonholes in the three years since I started sewing. My sewing friends told me that buttonholes were easy, and OMG THEY WERE SO RIGHT. That little attachment is awesome and the machine does all the work. I was surprised that it was so easy to do the buttonholes through all that gimp trim, and I had no problem cutting through that either.

I made the riding habit shirt following the measurements given by Saltpetre and Pins when she was making her blouse. Aaaand I did it all by hand! (okay, I'll admit that I hemmed it by machine because by then I was so very sick of the project and ready to move on) It was very pleasant and went surprisingly quickly. There are times when I just don't want to sit at the machine, especially since the lighting in my sewing room is terrible.


It isn't perfect.
  • I believe I should have made the collar wider, so I could fold it over. I'm thinking of adding an extension to it, because when I put on the cravat, the collar gets crumpled underneath and I have to fiddle with it a lot to get it to show above the cravat. 
  • Also, I think the collar is too big. 
  • And I should have left a vent in the sides of the shirt towards the hem so that when I tied it the back and front would overlap a bit. But no one is going to see that. 
  • It's possibly too short in the back, but again, no one is going to see it.
  • I wasn't able to flat fold the seams because I'd screwed up on the width of the shirt and had to fix it by cutting off an extension I had put in it to make it wider, which turned out not to be necessary at all and would have made the shoulder seams come halfway down my arms. 
I had a stressful week trying to figure out how to attach the lace at the neckline and wrists so that the raw edges wouldn't show. In the end, I just gathered it, folded a piece of bias tape along the gathered edge to hide the raw edges, and then stitched it into place.

The lace at the neckline is modern and partially synthetic, so it's heavy and slippery. I worry that it's too much and will make the neck opening gape, but I think I could just use a brooch to hold it closed if needed. Maybe not historically accurate, but this is for a pirate costume so I think I can take some liberties.

The lace at the cuffs is vintage, and I purchased it on ebay. I worry that it's not fluffy enough at the cuffs but there's nothing I can do about it now. I am not worried about it enough to redo it at this point, and I can possibly use the leftover yardage to embellish the collar of the shirt? Again, I know it's not historically accurate but as I said, pirate costume.

Oh, and I used mother of pearl buttons at the collar and wrists. I had collected quite a few over the years, don't ask me why, and was really happy I could finally use some.

NOW FOR THE ENSEMBLE


The cravat is this really cool looking synthetic paisley jaquard, but it's really thick and I think will be really hot, so I bought some dark red silk dupioni to make another one.

I would like to make a new, lighter weight petticoat to go underneath. The one I've been wearing is just so bulky. I have a pattern for a gathered skirt set on a yoke that I think I'm going to use. Not historically correct, but I think it will be very comfortable and provide the fullness I need for the skirt.

I haven't even attempted the jacket yet. Now I'm realizing it's almost October and I only have 6 weeks to make and embellish it. This sounds like a long time, but I am such a slow sewer, I'm not sure if it's enough time.

Monday, August 24, 2015

18th century riding habit -- Waistcoat

I've been working on my pirate costume for the Texas Renaissance Festival, which I will be attending with my sister in November. My goal this year was to actually put together an OUTFIT, not just pieces, and to use historically correct patterns.

So I bought the Mill Farm riding habit pattern to help me accomplish my goals. I already had stays from the Sherwood Forest Faire, which I posted about in March. But they are a little large, and I wanted to have something that fits a little better. I may still use them, and just overlap the lacing grommets at front or back. I've tried it, and it works.

But I also finished up my costume closeup stays, which I'd worked on over Christmas. When I first tried them on, they were wayyyyyy too small, because I hadn't taken into account the fact that putting all that boning in would shrink the panels. So I made a stomacher for it so I could adjust them a bit better, and now they fit, and they feel wonderfully comfortable... However. They stick out from my shoulder blades if I slouch the tiniest bit. Here are some examples:


See what I mean? I know several bloggers have made these stays, and they haven't mentioned this as a problem. If anyone reading this has experience with these stays, can you tell me what I'm doing wrong? I am slouching with a bit of exaggeration in these photos to illustrate the point I'm making, but this does seem a problem. How can I fit it? Is this just a common thing with fully boned, strapless stays?

Onto the riding habit. I made the waistcoat first, since it may be too hot to wear the jacket when I go to the fair. You never know, in early November. Could be 80 degrees, could be 45. If I have a waistcoat, I will have a workable outfit.

First came fitting the pattern to my dress form. The way I did it was by pinning the side seams of the paper pieces to the sides of my form, and then studying it to see what I'd need to do to fit it.


You can see that the main thing I needed to do was add a couple inches to either side of the center back. Oh, and I always need to take the waist up a couple of inches on every pattern.

The front was very large at the top, so I had to pinch away the excess material. I also took it in a little bit at the center back.


Sorry about the shitty pictures, but I didn't have anyone home to help me. I am wearing those blue stays underneath this. I'd actually made up the waistcoat once already at this point, and it didn't fit AT ALL NO MATTER WHAT I DID. I finally tore it up in a fit of rage and it felt AWESOME. Turns out, I didn't fit the paper pattern to my dress form after all, though I could have SWORN that I did. Maybe I just fitted it to see if I had the waist in the right place and forgot to check everything else.

I wanted it to look a bit rustic, so I used a sort of homespunny looking linen from Joann's, lined it with olive green silk from a 100% silk curtain I found at Goodwill, and trimmed it with this awesome antique gold colored gimp trim. I sewed up the vest by machine, but of course tacked all the trim on by hand which took FOREVER. I used plain gold buttons from Walmart.


I can't close the vest properly on my form because the boobs aren't in the right place.

I still haven't learned how to use my buttonhole attachment. And I don't know how to do a buttonhole stitch. I've watched YouTube videos on it a hundred thousand times and still can't manage it. So I decided to just do loops of coordinating trim to button up the vest.


I think that looks really cool. So I need to sew the button loops on, and I've been making a riding habit shirt a la American Duchess and Saltpetre and Pins, and I am sewing it by hand! All I need to do on it is put buttons on the cuffs and collar and add the lace trim. Then it will be ready to put up here. I almost have an outfit!!!!

Monday, March 30, 2015

1776 stays FINALLY DONE!!

Whew!! I spent every spare minute of the last two weeks sewing, alternating between Melissa's costume and mine. I finally finished binding my stays last Thursday, just in time for Sherwood Forest on Saturday. It was so much fun. I had a glass of mead, a shredded troll sandwich, and frozen chocolate covered cheesecake on a stick. I really wanted another glass of mead, but my allergies and sinuses were really bad, which often triggers my migraines. I already had a slight headache, and it was a super windy day with loads of dust and pollen in the air. I learned the hard way not to drink too much mead when my sinuses are acting up.

We got tons of compliments. In the previous two years, we've gotten precisely two compliments (one per year). Actually, those compliments were directed at Melissa, even though our costumes were the same (except made from different fabric) because I made them. But Melissa is beautiful and carries herself with confidence whereas I feel like a shy little mouse.

So I counted at least seven compliments this year, and many of them were from ladies who said they were experienced seamstresses. Many of them asked questions about the boning and a couple of them even called them stays, which is when you know someone knows their stuff. Others called them bodices or corsets, but I didn't care. It made all that hard, tedious work so worthwhile.

Here are a few pics.

I hate my face. Why couldn't God have blessed me with a nice jawline?
My stays...
Melissa's stays...


I love the lacing on these.
Look at that pattern matching!


A few construction notes... For each pair of stays, I used 3/16" half-oval basketry reed for the boning, and just put two in each boning channel, flat sides together. Boning channels were 1/2" wide. For the front lacing strips, I used 1/4" heavy duty steel boning. For the back lacing strips, I used regular 1/4" spring steel boning.

I bound my stays using very thin, soft, flexible leather. Melissa used narrow bias tape, but I can't remember if it was single- or double-fold. I made Melissa's stays but she did the binding on them and did a great job! She's never even done it before!

I know the edges aren't supposed to touch.

I shaved a little off the side back seam for Melissa's stays and she loved how snug they were. I accidentally cut the armholes of her stays too big. Mine felt snug but I could breath in them easily, and I wished I could have laced them tighter.

They were extremely comfortable, the reed boning held up beautifully, and the style is just gorgeous. Only two pattern pieces (okay, three if you could the shoulder strap), but I couldn't imagine achieving a better fit with a pattern that has more pieces. They can really cinch in your waist, and they make your bust area look amazing. I highly recommend the 1776 stays pattern from Corsets and Crinolines.

Monday, March 2, 2015

1776 Stays - First try-on and a few notes

Isabella's comment about front-lacing stays making it easier to get dressed reminded me that I didn't have to wait for someone to lace me up so that I could try on my stays and see how they fit. So I duly pulled on my chemise, petticoat, and skirt, took a deep breath and said some prayers, and slipped on the stays and laced them up. Then looked in the mirror and felt like jumping up and down with excitement.


The fit is AMAZING. The silhouette they give is AMAZING! I believe it would look good on anyone, any body type, any size. And being that this was the first pattern I've ever gotten from a book, scaled up, and then took the time to fit it to my figure, it felt like a MIRACLE that my efforts actually WORKED!! Can I be considered a sewist of intermediate skill level now???

They aren't perfect. For one thing, somehow I made them too big and the front and back lacing channels close completely, which is a bummer because I like to lace tight because the stays always loosen up after a few hours. They are tight, don't get me wrong. But I could stand to lace them a lot tighter. I expected either the front or the back to close completely, but not both. I can't think how to fix this at this point because taking the stays in at the side seam would move the shoulder straps/armscye back too much, and that part is already borderline about-to-not-fit. But that's easily fixed in the pattern and in fact I've traced Melissa's pattern to move the shoulder straps a little more towards center front and have taken in the side-back seam a bit. For myself, perhaps I can make a stomacher with a busk to take up some space so that when they are all laced up, it will help keep them snug as they loosen up.

Also, I have no idea if these two tabs at the side are supposed to be touching or not, nor do I know how to fix it. But I don't think it's a glaring mistake.


I bought a lovely piece of soft, thin leather off of ebay to use for binding. It's a little thicker than chamois, not much, but it's just a little bit more difficult to get a pin into to hold it in place while I'm sewing it on.

These little clips from Dritz (or was it Clover?), which I found in the quilting section at Joann's, are PERFECT for this job.


My needle wasn't doing a very great job at piercing the binding, so I bought some leather needles and some embroidery needles. A couple of bloggers I read mentioned not wanting to use leather needles because they leave too big a hole, but I wanted to try them anyway.

This bit was done entirely with a leather needle. I've taken as good of a close-up as I can, and I see nothing to concern me re: size of the hole left by a leather needle. I used Dritz leather needles and I used the smallest one in the package:


I was very happy with the leather needles as they go through the leather quite easily. That being the case, they also go through FLESH quite easily and I got a couple of nasty cuts in my fingers until I got used to using the needle.

Last night I bound a tab with a new embroidery needle and it worked just fine. I don't know what kind of needle my old one was (a dull one. Haha!) but I threw it away and I think I'll just use the embroidery needle for now because I don't want to get blood on my white stays due to carelessness with the leather needles.

Oh, and it seems to take me about an hour to bind each tab. At this rate it's going to take me right up till the last week of Sherwood Forest before my costume is ready! I am quite relieved to know that my skirt and chemise are now done (except to sew ribbon ties onto the cuffs of the chemise) and that the stays fit. Now I just need to make Melissa's stuff, but I think I'm going to have to teach her to bind the stays herself because of timing issues. I did try my stays on her and they fit her perfectly, so at least I don't have to make muslins to fit her.

Thursday, February 26, 2015

1776 Stays from Corsets and Crinolines - Construction

I'm extremely excited about my 1776 stays. I have finished the construction with the exception of binding them and I love the way they look. So feminine! I made them front-lacing and back-lacing. I laced them up with some leftover ribbon just so I could slip them over my head and check the fit. I haven't laced them up yet because I need help with that, but so far I think they're going to fit perfectly. I'm really proud of myself!


I boned them throughout with 3/16" half oval reed, two per channel with flat sides together. For the cross-wise boning in the bust area I just used 1/4" cable ties because I couldn't get the reed through the twill tape that I used for the horizontal boning channels, and when I trimmed it down to slide through more easily it kept breaking. The center front lacing channels are boned with heavy-duty 1/4" spring steel (to hold the tummy in), the back boning channels with one reed and one regular 1/4" spring steel in each channel, and the curved side channels with spiral steel.


To trace the boning channels, I took a tip from my sister, who practices Sashiko embroidery, and traced the pattern onto very lightweight, sheer interfacing, then ironed the interfacing onto the fabric that was going to be on the innermost part of the stays. I traced only the outside line of each boning channel and drew an arrow in the direction of where the other line should be sewn. Then I used my sewing machine foot to gauge the depth of the channels. Measuring stuff gives me anxiety and nothing ever turns out right when I measure, so this was the easiest way for me to figure out how thick to make the boning channels and took the stress right out of tracing them to the fabric.


I didn't really intend to make these front lacing, but I had to because I'd cut out all the pattern pieces before I realized I meant to put the center front on a fold. So I had to add an extra boning channel on the edge of the center front of each piece to accommodate the grommets. This added an extra inch to the girth of the stays. When I slipped them over my head to briefly check the fit, I noticed that the center back edges will meet more closely than I had anticipated, and I think this is why. It's still going to fit just fine, and I don't mind if the center back edges meet because my silhouette is still going to look awesome even if I don't lace super tightly.

I've got 1/2 of my skirt pleated up and should finish pleating the other half tonight. Then I'll sew it up the sides and be done with it. I'm expecting a nice big piece of super soft, thin leather in the mail today to use for binding the corset. I'm almost done! Then I have to start on Melissa's costume. I think I'm going to have to teach her how to sew the binding on her stays because I may not have time to do ALL of that plus my own before the end of March when we go to Sherwood.

Tuesday, February 17, 2015

Victorian corset part 3: I think this will do

Over Christmas break, I decided to give Simplicity 2890 one last try, and I think this one will work. I meant to raise the upper edge of the corset to give my bust a little more coverage but I forgot. I think it'll still be okay even though I really wanted a corset that cupped my bust more than this. I might try another Victorian corset pattern, but definitely not doing one with gussets again no matter how pretty I think they are.

I had a sobering realization some time after making the pink corset of doom that I needed to lose some weight. That perhaps the corset wasn't working because I was no longer the pattern size I'd always been. I looked at the pictures, and I took a good hard look at myself in the mirror. I started counting calories on Feb. 7 and I've since lost 6 pounds (though I gained back two pounds last week after too many indulgences). Hooray for me! These pictures were taken after I'd lost about four pounds. It doesn't sound like much, but I'm short, so five pounds is an entire clothing size on me. Five pounds makes a huge difference in how my clothes fit.

Without further ado, here is my latest corset. Click on the pictures to enlarge.


I wonder if anyone can weigh in to let me know if my bust looks right in this? Is it too much like shelf-boob? My bust gets pushed up when I sit unless I'm sitting stick straight. Is that normal? I'm sure the bust fit will improve as I lose weight. I don't tighten the laces much on top, to avoid squishing my bust.

I didn't really try for any waist reduction. I just wanted my waist measurement when laced up to be the same as when it's unlaced, which required enough tightening to make me uncomfortable because the corset adds girth. I'm happy with the way my waist looks in the pics. I don't know how people can stand lacing tight enough for waist reduction of the standard 2 inches, but maybe I'm being a wimp.

I probably should just get one made by Kay Gnagey while she's still doing custom corsets, but I don't have the money for it right now and I'd already spent the money on the supplies for this pattern so I felt like I had to keep trying to get it right. Boning and busks are expensive, mainly because of shipping costs. I didn't want to have thrown my money away.


Thursday, January 29, 2015

1776 stays from Corsets and Crinolines - Patterning & Fitting

I never finished the Diderot stays. The day I tried to put grommets in them, I discovered that the hopsack linen and the sturdy cotton twill I used as lining were, together, too thick to be able to make the big holes for my size 0 grommets. The weave of the hopsack was too loose and after I pierced it with my awl, it would immediately start to close back up. I gave up.

Instead I'm trying to make the 1776 stays from Nora Waugh's Corsets and Crinolines. It's only a two-piece pattern so I hope it will go quickly because Sherwood Forest starts next weekend. But Melissa and I probably won't go until March, so I have time to scramble together our costumes, but I'm a slow sewer so it will still be a crunch.

This is the first pair of stays that I have actually tried to fit to my figure, and I'm really, really glad I've taken the time to make several muslins, as irritating as it is.

The right side of this picture (viewer's right) shows how this pattern first fit me after scaling it up but without making any other changes. I think the original wearer had very slender hips because there was a nine-inch gap between the lacing holes at my hips but only a two-inch gap at the lacing holes at the top.


I took in a little bit at the top of the center back, and then put in an extra tab on the side-back piece, adding a little to the waist as well. The new mock-up fit my dress form much better.


I felt that it was still a bit long in the waist at the back, so I pinned up the excess and transferred the changes to my pattern piece. Even though, to my eyes, the center back looks straight on the dress form, it was clearly NOT straight on the pattern when laid flat.


I fixed the center back pattern piece and sewed up a new mockup. I haven't made any changes to the front pattern piece at this point. It fit my dress form quite nicely and I thought I was ready to go, but a little voice at the back of my mind kept whispering, "But everything you've read on the costume blogs says that the seam is supposed to be curved at the side FRONT, not the side back." I tried to convince myself that it wouldn't make any difference on a stays pattern that consisted of two pieces, and only one seam anyway, but I just had to retrace the pattern. I transferred the side-back curve to the side-front and straightened out the side back.


Sewed up a fourth muslin and pinned it to my dress form. I honestly couldn't tell any difference in the fit, but I suppose I'll keep it like this just for my own piece of mind since I don't know if it's okay to keep the side front seam straight and curve the side back.


One last change I am making to this pattern--and I won't bother with a muslin for this small change--is to take out that extra tab at the side-back. You can see on the dress form how it sticks out.


It was easy to just fold it back and tape it down on the pattern to get it out of the way. The line of the seam wasn't affected at all.

Now I just need to decide on what fabric to make this out of. I have some beautiful vintage silk brocade, supposedly hand-woven, that I bought specifically to make stays. But I feel like it should be part of a fabulous fantasy costume and I am having trouble visualizing how I want it to look. So I think I'll save it until I have a clear idea of the look I want. I'm leaning towards just using some white linen in my stash and making a peasanty-looking skirt. For some reason I've always liked the peasant look even more than high-class lady. But in my everyday life, I'm a bit of a plain jane. I can't tolerate heels and I can't stand the way fashionistas in this city dress. So my love of peasant looks is really a reflection of my natural tastes in fashion, I guess.